The Dummy Camera Red Blinking Light is a cost-effective, DIY security solution for homeowners. By strategically mounting fake cameras on brick surfaces, you create an illusion of enhanced security without expensive real camera installations. The process involves using the right outdoor-grade metal brackets and tools for stability, cleaning the brick surface for better adhesion, and strategically placing cameras for optimal visibility. Activation of red blinking lights completes the setup, deterring intruders and providing peace of mind. Regular maintenance is key to maximizing effectiveness.
“Transform your property’s exterior with a powerful security measure: the dummy camera red blinking light installation. This article guides you through understanding this innovative device, choosing the right mounting hardware for brick surfaces, and provides a step-by-step installation process. Learn about its numerous benefits and considerations to effectively deter potential intruders. Discover how mounting fake cameras on brick can enhance your home or business’s security without breaking the bank.”
- Understanding the Dummy Camera Red Blinking Light
- Choosing the Right Mounting Hardware for Brick Surfaces
- Installation Process: Step-by-Step Guide
- Benefits and Considerations for This Security Measure
Understanding the Dummy Camera Red Blinking Light
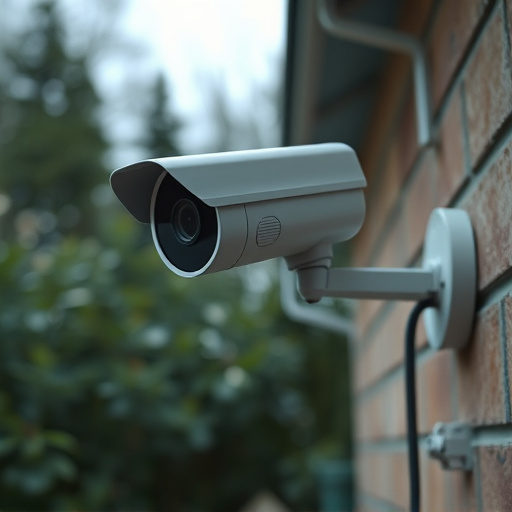
The Dummy Camera Red Blinking Light is a innovative security solution designed to deter crime and enhance home safety. This device simulates the presence of an actual surveillance camera, utilizing a red blinking light that mimics the activity of an operational camera. By strategically placing this fake camera on brick or other surfaces, homeowners can create the illusion of enhanced security without the cost and hassle of installing real cameras.
Mounting Fake Cameras on Brick is surprisingly straightforward and can be accomplished with basic tools and materials. The red blinking light can be attached to a sturdy mount designed for outdoor use, ensuring it’s visible from various angles. This simple yet effective device not only deters potential intruders but also provides peace of mind, knowing that your property is being monitored even when you’re away.
Choosing the Right Mounting Hardware for Brick Surfaces
When installing dummy cameras with a red blinking light for brick surfaces, selecting the appropriate mounting hardware is key to ensuring stability and longevity of the setup. For brick walls, consider using metal brackets designed specifically for outdoor use and heavy-duty loads. These brackets should have robust screws and anchors that can penetrate the brick effectively, providing secure attachment points.
Before making any purchases, assess the type and thickness of your brick surface. Different types of bricks may require hardware with varying specifications. Additionally, ensure that the chosen mounting hardware comes with all necessary tools for installation, including a drill capable of handling brick and concrete. Using the right hardware from the outset can save time, effort, and prevent future damage to your property or equipment.
Installation Process: Step-by-Step Guide
Installation Process: Step-by-Step Guide for Mounting Fake Cameras on Brick
To begin, gather your materials: dummy cameras with red blinking lights, brick-specific mounting brackets, screws suitable for brick, a drill equipped with a mason’s bit, and a level. Ensure the area is prepared by cleaning the brick surface to achieve optimal adhesion. Next, select the desired placement of your fake cameras, marking the spots where you’ll attach the brackets. Using the level, ensure each camera will be positioned at eye-level or slightly higher for maximum effectiveness.
Drill pilot holes into the brick, being careful not to damage surrounding areas. This step ensures the screws will grip securely. Attach the mounting brackets to the brick with screws, securing them tightly but without over-tightening to avoid damaging the brick. Once brackets are in place, carefully mount your dummy cameras onto each bracket. Verify each camera is level and firmly attached before turning on the red blinking lights to complete the installation.
Benefits and Considerations for This Security Measure
The installation of dummy camera red blinking lights offers a range of benefits for home and business security. One of the primary advantages is the deterrence factor; potential intruders are less likely to attempt illegal activities when they know they’re being watched, even if the cameras are not actual recording devices. Mounting fake cameras on brick walls or other surfaces is an effective strategy as it can be challenging to distinguish between real and dummy cameras, providing a layer of protection for properties.
When considering this security measure, several factors should be kept in mind. While the lights can serve as a powerful deterrent, they may also lead to false alarms if not installed and positioned correctly. Proper placement is key; ensuring the lights are visible from the street or potential entry points can maximize their effectiveness. Additionally, maintaining these dummy cameras regularly is essential to preserve their credibility as security features.
The installation of dummy camera red blinking light systems, particularly for mounting fake cameras on brick surfaces, offers a cost-effective security measure with numerous benefits. By strategically placing these devices, homeowners and businesses can deter potential criminals, enhance safety, and create the illusion of 24/7 surveillance. With proper mounting hardware and a step-by-step installation process detailed in this guide, anyone can transform their brick surfaces into a secure environment. Remember that while these cameras are not active, their presence alone can serve as a powerful deterrent.